Blog

Website Design Grants For Nonprofits

A jar of pennies turned sideways spilling its content out.

Part of the nonprofit struggle is choosing how to spend the money you raise. There is usually not enough funds to completely meet your goals. At the same time, investing in things like marketing and websites cost money as well. Nonprofit organizations of all sizes struggle with how to raise and allocate funds.

A great way to relieve the stress of this decision is to apply for grants. A grant can provide you with much-needed funds to accomplish a particular purpose. In this case, we are talking about website design grants.

In 2021, it’s no secret that a strong web presence can make or break your marketing. A good website can help you raise more money, attract more volunteers, and raise more awareness. But websites are not cheap, especially good ones. 

Today let’s talk about how to plan for, find, and apply for website design grants for nonprofits. 

How to determine a website budget

These days, launching a website is not as expensive as you may expect. But there is still a very real cost associated with a website project. There may be costs that you aren’t aware of. It’s important to determine a budget for your website project ahead of time. This way, you know exactly what size grants you’ll want to go after. In addition to that, if you win the grant, you’ll be ready to dive in with the development and design process right away. 

So here are some things to build into your nonprofit WordPress website budget. 

  • Hosting – The hosting account you choose is important to the overall security and performance of your website. We might be biased, but we recommend Cloud 22! 
  • SSL – Most hosts come with a free SSL certificate for your website. An SSL certificate encrypts your syte and makes it secure for accepting donations. If the host you choose does not provide a free one, make sure to budget for the cost of one.
  • Domain name – Domain names typically cost about $15-$20 per year. Ensure that the domain name you want is available and that you are aware of how much it will cost to purchase. You can often get a domain name through your hosting provider.
  • Themes – The theme you choose for your nonprofit website will determine how it works and how it looks. They vary widely in price; some are free and some cost a certain amount per year. Check out our post on how to choose the perfect WordPress theme for your nonprofit website.
  • Plugins – Depending on what you need your site to do, you’ll need to budget for specific plugins. There are many free ones, but the more power you need, the more you will pay. For example, the GiveWP donation plugin free. But if you need some specific features – like recurring donations – you’ll need to budget for a premium plan.
  • 3rd party tools – What tools will you need to integrate with your website for it to be successful? Maybe you want to use a 3rd party donation tool or email marketing tool. Make sure you know exactly how much it costs for the plan that you want.
  • Courses to learn – If you are going to build the site yourself, or have someone on your team build the site, you’ll probably want to invest in a course or two. YouTube has a ton of great WordPress tutorials, but it’s also a good idea to browse sites like LinkedIn Learning to find premium courses that you can follow along with. 
  • Developers/marketers to hire – If you don’t want to build the site yourself but instead hire a professional, gather some quotes for that. Many designers and developers offer discounts for nonprofits. Regardless, make sure you have a good idea of their project rates. 

How to find website design grants for nonprofits

Finding grants for nonprofits online is as simple as a Google search. Dedicate an afternoon to looking through Google to compile a list of forums, newsletters, websites, and applications that suit your needs. 

Remember that not all grants will be specifically for website design. Some may be for marketing or building operations. If you receive that grant, you can decide how to use those funds.

It’s a good idea to make a list of all the grants you can find, then parse them down according to 3 criteria. GetFullyFunded.com breaks this down perfectly: 

  • Geographic Fit– Funders typically choose to support nonprofits located in certain geographic areas. This may be a city, region, state, or country. When researching, if you find they don’t fund the area you serve, you’re not very likely to get a grant….so I wouldn’t consider them. But if they like funding nonprofits in your city, for example, it could be a match!
  • Programmatic Fit– Consider a funder’s mission, goals, and areas of interest and make sure that what your nonprofit aligns with these. Otherwise, you’re not likely to get a grant. Let’s say you run a youth development program, and you find a funder whose priority is youth. It could be a match!
  • Philanthropic Fit– Find funders who want to give away the type of funding you’re looking for, whether it’s programs, projects, general operating support, capital, or something else. If you need money to expand a program and they provide grants for program development, it could be a match! But if you’re looking for general operating funds and they only give grants for programs, you might not be so lucky.

Grants are massively competitive. Make sure you are spending the most amount of time on grants you are more likely to win, rather than wasting time on a long-shot. 

Here are some good databases and websites that you can use to start searching for available grants:

Here is a list of specific grants that you may want to look into. If any are expired or the due date has passed, save their information anyway. Many grants or quarterly or annual. These are specifically for website design projects for nonprofit organizations: 

How to apply for a grant

It’s not always enough to find an application, fill it out and leave it at that. Nonprofit grants are highly competitive. You’ll want to do some research and preparation before applying in order to maximize your chances of winning.

Make sure that you are applying for a grant at the right time. Grants are not ideal when you are first starting your organization, if you need money very quickly, or for things like ongoing fundraising and payroll. 

In addition to preparing the website budget above, here are some things to have on hand when applying:

  • A short brief on the concrete benefits that this grant will bring you. The website should have actionable goals and specific benefits. The more you can drill down on how this website will change your mission for the better, the stronger your case.
  • A list of needs that is prioritized. Since you already have the budget from the beginning of this article, you’ll want to make sure that is broken down into individual costs. For example, a fancy marketing plugin may not be at the top of the list, but hosting definitely will be. 
  • Have a timeline for spending. The grant process can take a long time. It can take weeks or even months to hear back. If you need this website right away, consider another funding option. But if this can be a long term project, make sure you have an idea of how long it will take to build out the site once the funds are potentially rewarded to you.

Once you’ve received the funds from your grant, one of the first things you will need to secure is hosting. Hosting is a vital part of the website experience; a website can’t exist without a host! When looking for hosting, look for a solution that is active, fast, and secure. If your hosting is not up to par, it can affect the experience of your visitors. 

Cloud22 Managed Hosting checks every box. We manage your updates – making sure that when your theme developer releases an update or patch, you get it right away. We back up your site, just in case you make a wrong move in your theme settings.  Our servers are integrated with LiteSpeed cache and Cloudflare CDN, so the beautiful design you used your theme to build is served to visitors quickly.
Design Mistakes That Can Affect Conversions

It’s safe to say that the design of a website – how it looks and the experience of moving through it – is important. But just how important is website design to conversions? The answer: very! 

If you don’t believe me, here are some statistics to prove it:

  • 48% of users believe website design is the #1 factor when judging a business’s credibility.
  • 38% of visitors will stop browsing a website if the layout is unattractive.
  • The average user needs only 50 milliseconds to form an opinion about a website.
  • 94% of users create their first impression of a website based on web design alone.
review42.com

Design mistakes can affect the number of conversions you get on your site. But that doesn’t mean you should scrap your entire site and start over again. There are plenty of things you can do to identify what mistakes could be hurting conversions so you can fix them.

In this post, we’re going to go through all the design mistakes that can affect conversions. Then at the end, we’ll review some methods you can start using right away to identify and address those problems. 

So… what design mistakes are you making that are affecting your conversions?

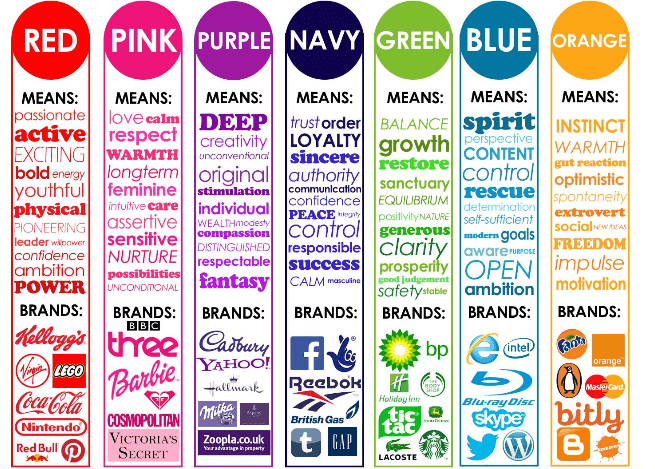
Not using color strategically

Color should always be used in a smart way. The color you use and where you use it should draw attention or elicit emotion. A good looking website is always secondary to a useful one. If the colors you pick look nice but don’t create the effect you need to convert, you are using the wrong colors. 

If you can understand the psychology of how we perceive and react to color, you can build a brand identity and website around those principles. 

Color chart that describes the marketing value of different colors with recognized brands that use each.
(image source)

Colors should also be used consistently. After building a color palette, stick to that palette and do not deviate. This way you turn the colors into a language that your user subconsciously can read. 

Forgetting to prioritize mobile responsiveness 

If you are forgetting to design your site to be optimized for small screens, you are making a huge mistake. According to this 2021 study, 68% of companies with a mobile-first website increased their sales.

Because most website browsing these days is done on mobile devices, it’s important to prioritize that experience. But you don’t need to be a highly experienced developer to ensure that your site is mobile optimized. 

Some rules of thumb for good mobile design: 

  • Use a theme that is fully responsive so it does most of the work for you.
  • Put the most important information higher up on pages so less scrolling is needed.
  • Avoid pop up messages or ads on mobile devices. 
  • Make sure buttons are large enough to be used on mobile screens. For the most important converting areas, use a button instead of a text link.
  • Use large font sizes – at least 14px!

Failing to optimize your CTAs

CTA stands for Call to Action. This is the section of your website that directly instructs or invites the user to do something. This is like the front porch to your conversion. Think of phrases like “Download the ebook now!” or “Sign up for our email list!” These are phrases likely to show up in your CTA.

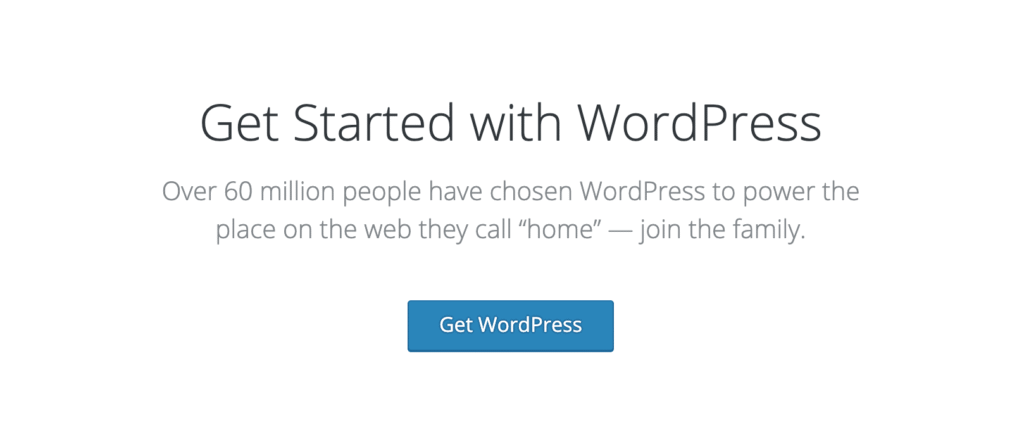
A screenshot from WordPress.org that shows a call to action for downloading wordpress.

This CTA on the WordPress.org website is great. There is a clear invitation to do something in the title. A small sentence details why you may want to complete the action. The button is large, stands out against the background, and utilizes another strop verb.

Use a CTA effectively by following some basic rules:

  • Use a strong verb like get started, download, buy, sign up. But don’t use verbs like click. How is the user supposed to know what happens when they do?
  • Make the CTA stand out. Use color and large text to do this. Maybe even make this section full width or add a border around it.
  • Don’t crowd this section. Avoid using lots of imagery! 

Links and buttons don’t stand out

More often than not, someone will convert by choosing to click a specific link or button. Like we talked about in our previous section, these areas probably appear in your CTA. 

Buttons and links should stand out strongly against not only the background of the page, but in contrast to other content. For example, if your text is black and your links are black it will be hard for people to see them. But if your text is black and your links are red and bold and underlined, there’s no mistaking them. Same for buttons. If your background is a light blue, and your buttons are blue, they might all meld together. Use a contrasting color if a button is on a colored background.

A good rule of thumb is to make clickable elements like links and buttons their own unique color! If a bright pink is part of your color palette, consider reserving it just for links and buttons. 

And remember to always underline your links so they stand out from the rest of your text. Most people who use the internet have come to understand that links are decorated with an underline. So play into their expectations and make those links easy to find! 

Using poor stock photography

Good stock imagery is relevant to the goal of the website and supports the emotional message of the rest of the content. But unfortunately, there is a ton of bad stock imagery out there. 

Cheesy photos can turn off visitors because they are impersonal, bland, or just disconnected. Avoid using photos of people that are highly photoshopped, stiff, or unrealistic.  People tend to like seeing faces in marketing, but that doesn’t mean your site needs to be coated in images of people beaming and staring directly into the camera. 

Take this example below. The people in it look posed, the photo looks incredibly edited, and the lighting is very artificial. 

Stock image of business people in a huddle.

As a contrast, look at the alternative below. The environment is much more realistic, the lighting is pretty but not overdone, and the people’s expressions look much more genuine. 

Stock photo of man and woman in business attire giving a high five.

You don’t need to hire a professional photographer to get good images for your website. Use Unsplash or Pexels to get great free options for stock photos. You’ll be able to find examples of If you want to invest some money and get better options, look at the Adobe Stock Photo library.

Real people using or interacting with your product or service will almost always be better than a stiff stock photo. Most people these days have a high quality camera in their smartphone. So consider planning a simple photo shoot for your website! 

Being too wordy with text

Your brand is important and complex. There is so much to share about your goals, mission and strategies. But like we discussed at the beginning, most people want to skim a website to find what they need. Save the verbose content for blog posts! 

When writing the content for other pages, be as concise as possible. Use headings, subheadings, and short paragraphs of text. If you’re using less text, this also helps your design be more mobile responsive. 

If nothing else, remember that people mostly skim websites. It’s a rare occurrence that someone will come to your site and take the time to read every single page from top to bottom. Good design ensures that the steps to convert are easy to find even when skimming.  If your site content is easy to skim, users can find what they are looking for much more quickly. 

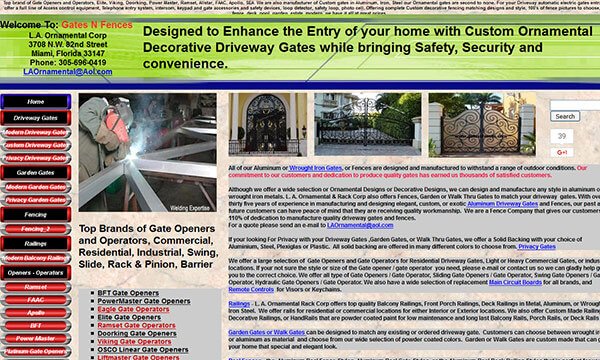
Take a look at the site below – where are your eyes supposed to go first? There is so much text here, it’s almost impossible for someone to find what they want quickly.

Screenshot of poorly designed web site.

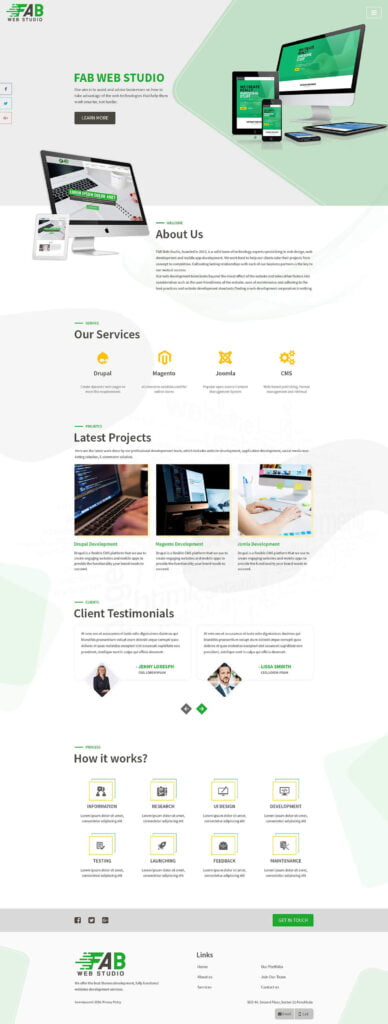
Now look at this example. See how the information is broken up with subheadings and various imagery? It’s much easier for the eye to skim over this page and find the relevant section.

Screenshot of well designed site with lots of white space.

Having sloppy navigation

Take a look at the current navigation bar for your website. Do you think someone could convert in 3 clicks or less?  If not, you may need to move some things around!

Here are some tips for organizing your navigation menu in a smart way:

Be concise: Consider “About” instead of “Learn about our company” The navigation should be simple to skim in order to find the appropriate link. 

Order links in a thoughtful way: Consider why people come to your website. If you sell boating equipment and also have a small blog to help with marketing, the links to your shop should definitely come before the blog link.

Highlight the biggest CTA: Try highlighting or outlining the link in your navigation that is most important to your website goal. For example, many nonprofits will use a big green button to make their Donate link stand out in the navigation menu.

Use existing web traffic: Look at your Google Analytics to see how people find information on your site already. Then use the navigation menu to make it easier for them. Use Behavior Flow/ User Flow to decide how to nest items. You might even notice that people are spending a lot of time on a page that is not in the navigation, and so you might want to add it.

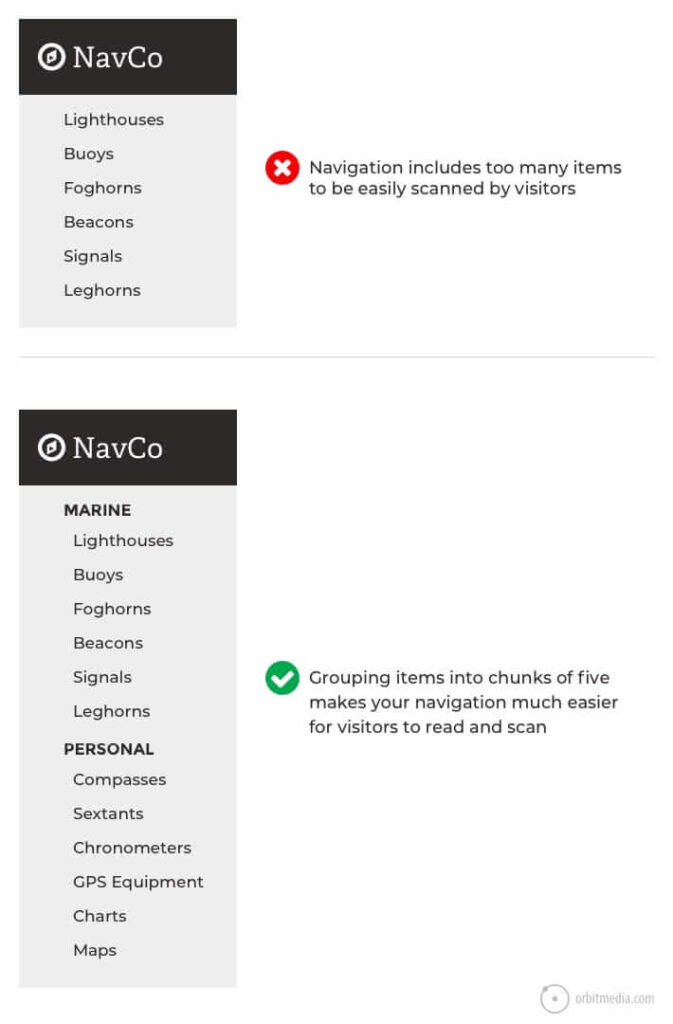
Group sub menu items: If you need to nest pages within the navigation, consider how to create groups. Long list of sub-items can be overwhelming and hard to search. If you can group long lists of links by similarity, users can find what they need much more quickly. Check out the screenshot below to see what I mean. 

Screenshot of good and bad menu grouping.

Making your text too small

We have already made our text more concise, now we need to make sure it’s readable. Some web design trends call for tiny and dainty fonts. But we want your site to be legible to everyone visiting it!  No one wants to have to squint or zoom in to find what they need. This will slow down your users and be one more roadblock on their way to converting.

  • Body fonts should be about 14px-16px. 
  • Text input sizes should be slightly larger (meaning the text people will enter into form fields)
  • Preview mobile designs on an actual mobile device to confirm legibility.
  • For text-heavy pages, like blog posts or articles, bump body fonts up to 18px or even 20px.
  • The ideal width for a block of text is 45 – 75 characters. After that, our eyes start to tire.
  • Set line height to be about 150% that of the font size.

Designing for yourself, not for your target audience

This is one of the biggest mistakes I saw when designing websites for clients. We tend to feel so close to our brand that it feels like an extension of us. We want to pick colors and designs that we like; after all, you as the business owner will be looking at this site more than anyone else! 

But it’s important to remember that in most cases you are not your target audience. The design of the site – fonts, colors, imagery, etc. – needs to connect to the people who you want to convert. The strongest design choices are made with them in mind. 

With that being said, it’s important to do your research. Who is your target audience? What do they want to see? What do they need to understand? What do you want them to feel? What information needs to be prioritized? 

Once you know all of that information, the colors and layouts and images you use must serve those needs. Your personal preference won’t play a starring role.

How to find which design mistakes are hurting conversions

So we’ve gone over all the ways that design can affect conversions. Now, let’s talk a little bit about how to learn which design choices are strongest and which are weakest. Maybe you want to experiment to see what choices will work out the best.

Luckily, there are many ways to do this. 

Heat maps

A heat map shows you where people clicked or performed other actions on your website. Heat maps look sort of like weather maps, which visual indications of where most actions were taken. Use HotJar.com to start collecting heatmaps of your website.

A/B testing

A/B testing is when you have two (or more) options and direct users to each one in equal part. So if you have two options, 50% of your traffic will see one option and 50% will see the other. You can then determine which group converted more!

User testing

Finally, just ask your audience! User testing can be conducted in so many ways. There are companies you can hire for user testing. Or you can simply ask a group of existing clients, customers, or volunteers to try out the site and tell you what they think. It can be as easy as a verbal report. Or you can create a form to collect feedback.

Remember that even a site that is perfectly designed needs to always be active, fast, and secure. A slow or glitchy site will deter users no matter how much you have optimized the design.

Cloud22 Managed Hosting checks every box. We manage your updates – making sure that when your theme developer releases an update or patch, you get it right away. We back up your site, just in case you make a wrong move in your theme settings.  Our servers are integrated with LiteSpeed cache and Cloudflare CDN, so the beautiful design you used your theme to build is served to visitors quickly.

How to Set up a Swag Store for Your NonProfit

Man and woman pack items in brown cardboard boxes.
Photo by Kampus Production

If you run a nonprofit organization, chances are you are always trying to discover new ways to fund your mission. Asking for donations is a tried and true method. But when donor fatigue sets in, you want to have options. What better way to offer options than with a swag store?

In a previous post, we reviewed why setting up a swag store is a great idea. A store brings more revenue and brand awareness to your organization. And merchandise is a great way to thank donors and volunteers. Our previous post on swag stores can help you plan everything out.

Once you have these basic concepts nailed down, it’s to build your store! This part of the process may give you pause. It can be daunting if you’ve never built a website or online store before. Luckily, you can use WordPress, WooCommerce, and Printful to build a store quickly with minimal know-how and zero coding knowledge!

Keep on reading, because in this post we are going to walk step by step through how to set up a swag store for your nonprofit with WordPress.

What programs and software do you need to set up a swag store?

You can begin building out your swag store with three simple tools: WordPress, WooCommerce, and Printful. With these three tools, you don’t need to worry about handling the merch at any point in time. There are zero up-front costs and Printful handles all the shipping for you! 

If your nonprofit’s website is already built with WordPress, you’ve already got that step covered! 

You’ll need to install WooCommerce on your WordPress website

WooCommerce is the tool that sits on top of your WordPress site. It allows you to build a store, product pages, and similar features directly on the site. It also connects to the payment processor so you can accept money for goods!

  1. Go to your WordPress Plugins page and click Add New. 
  2. Search for WooCommerce.
  3. Click Install, then Activate

The Setup Wizard will begin and you’ll be asked to answer a series of questions. This is for establishing important information right away. Answer all questions as best you can. If you currently don’t know an answer, don’t worry! You can always edit this information later.

When you’re done, go to WooCommerce, then Settings in your WordPress dashboard and ensure that your address, currency, and similar options are correctly set on the general tab. Make sure that you follow the WooCommerce documentation in order to connect to your payment gateway.

Now, create an account with Printful and connect it

Printful is the company that you can use to design and ship your merch. They connect to your site and when a product is purchased, they physically create it and ship it to the buyer. Printful is fantastic because you don’t have to buy inventory; you just pay a fee for each item sold!

  1. Go to Printful.com and click Sign Up
  2. Choose your method from the given options. As a nonprofit organization, it’s probably best to sign up using your nonprofits email.
  3. Answer all the following questions in order to build your account.

Where do you find designs for your merchandise? 

It’s not enough to just sell a t-shirt or hat through your store. It has to be branded and specific to your nonprofit. 

You can use your logo for the merch. That is the simplest option, since you should already have that image file on hand. Just make sure it’s the highest quality version of the image possible.

You can also use a custom design for your merch. This will be more expensive and time intensive, since you will need to hire a designer to do this. However, it can be unique to a special cause or fundraiser, making that merch limited edition!

It is incredibly important that you use original artwork or artwork that you already own. Never ever pull an image from Google Images to use on your merchandise!

How to set up your store using WordPress, WooCommerce and Printful 

Let’s walk step by step how to connect your WordPress site, WooCommerce plugin, and Printful account. 

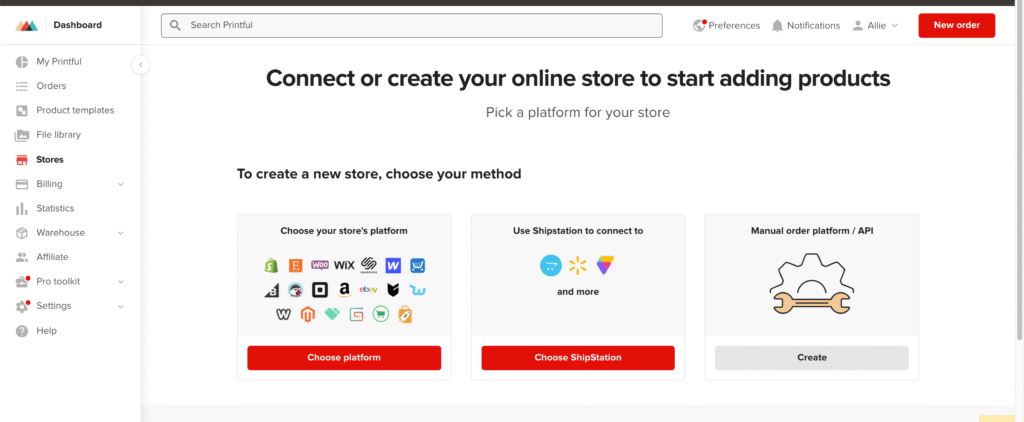
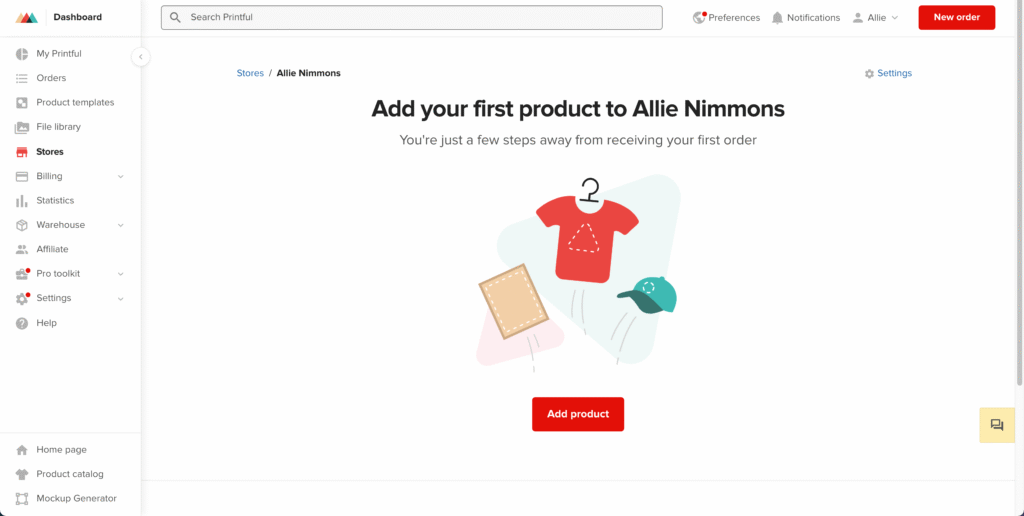
When logged in to Printful, go to Stores. Choose the “choose platform” button.

Setup Printful start screen.

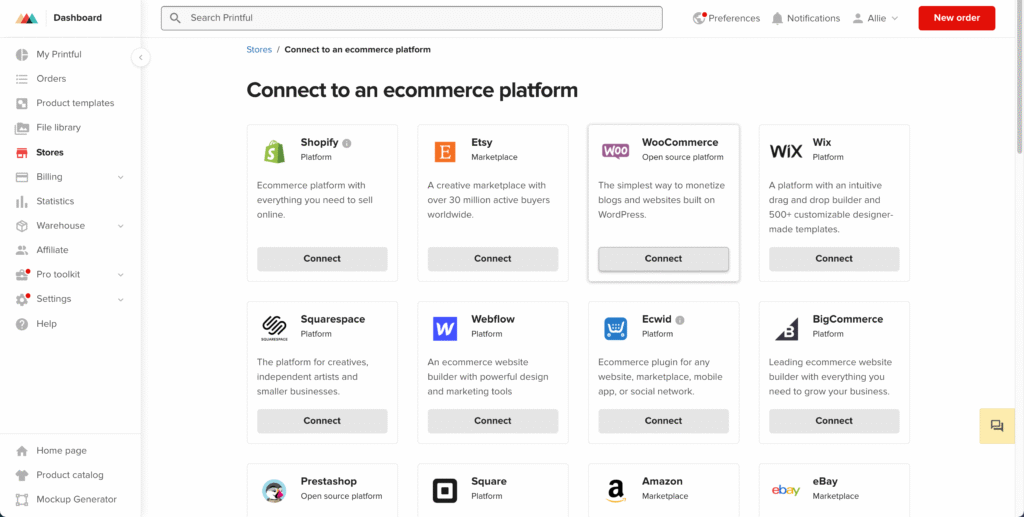
Choose WooCommerce from the options provided. 

Setup Printful and WooCommerce

Choose the “set up for an existing store” tab. Printful has a handy video right there on the page for you to follow! Follow the steps as they lay them out. It’s a good idea to follow the steps directly from their website so you know the process is always up to date! 

Once you’ve finished following all the steps, you should get a confirmation screen that looks something like this:

Add products to Printful

Now you’re ready to add your first product. 

Let’s do this together now so you can see how the software connects. Start by choosing Add Product from the confirmation page.

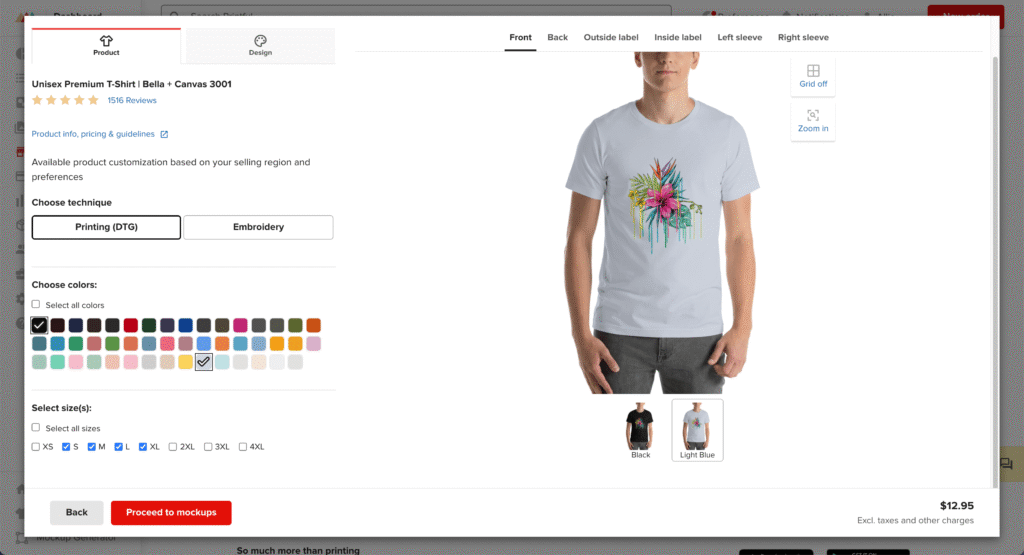
You’ll be met with a ton of options! Browse through until you’ve found the item that you want to use for your first piece of merch. I’ll go with a classic t-shirt in a women’s style.

Take your time and explore all of the customization options that Printful offers. You can drag and drop your design onto the merch, choose colors and sizes, and more.

I added a flower design, selected some sizes, and chose 2 color options:

Add design to product in Printful.

Click Proceed to Mockups to choose some display options that will show on your WooCommerce store. This is great for items that will be used; you want to show them in context so buyers can get a good idea what it would be like to use that item themselves. WHen you’re done, click Proceed to Details.

Here is where you can add a title and description. You can also just use the default text that Printful provides. When you’re done, click Proceed to Pricing.

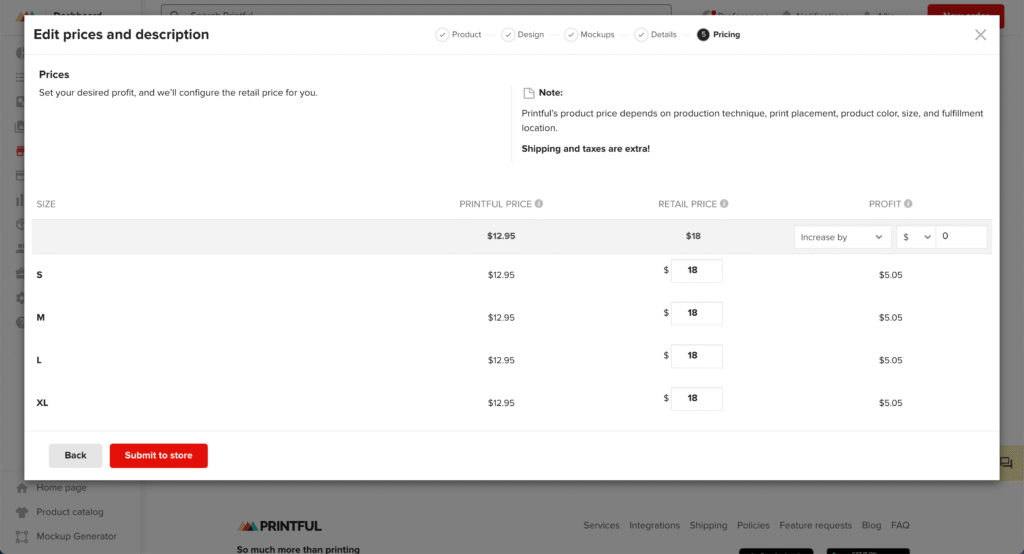
Adjust your pricing on the next screen:

Edit product prices on Printful.
  • The Printful Price is how much Printful will take in order to produce and sell the item. 
  • The Retail Price is how much it will cost the person who buys the item. 
  • And the profit is how much you will get at the end of the sale. 

If you want to make more of a profit, you can increase the retail price and Printful will do the math for you.

When you are done setting your pricing, choose Submit to Store.

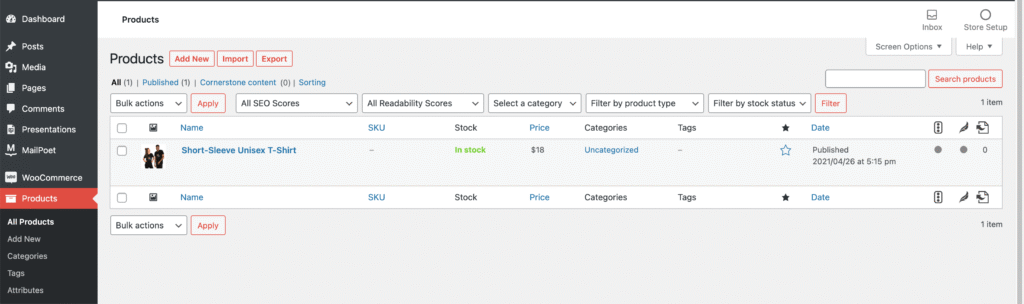
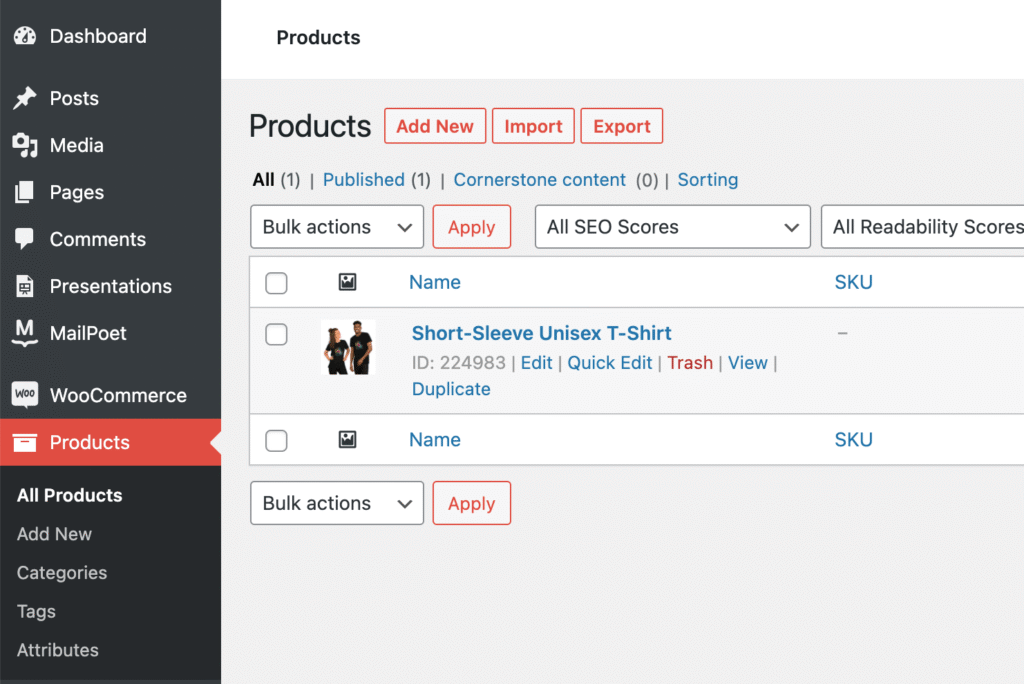
Now, we can go back to our WordPress site and choose the Products navigation item.

Add products to WooCommerce

Amazing! The Printful item has been added to our list of items with all the information we set.

How do you edit and remove items? 

Now that your store is set up and has it’s first item, we need to learn how to edit items. Maybe your cost changed. Or maybe you want to update a description. The process for editing your item is simple. 

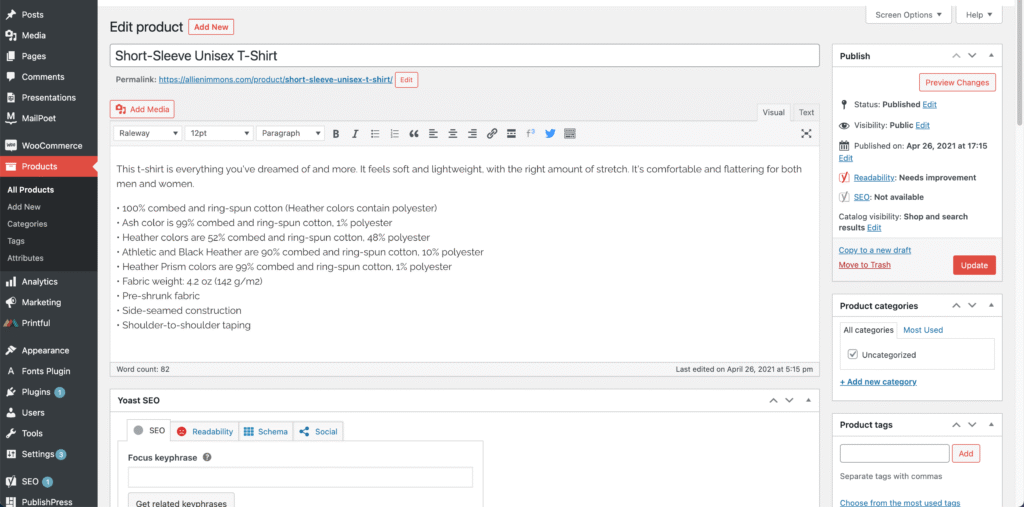
From the Products page in your WordPress dashboard, hover over the item and choose Edit.

On this page, we can edit the title, description, and category. Add a category if you don’t already have one. Categories are useful for letting buyers search your store. Examples of categories might be “clothing” “accessories” “bags” “stationary” etc.

Edit products

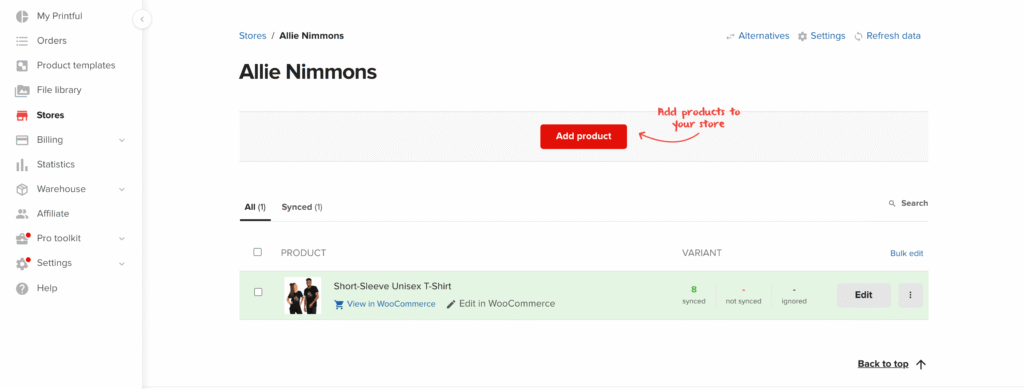
If you want to edit the product’s price or features, go back to Printful and go to the Stores page. Find your product and choose Edit.

Add more products to Printful.

Here you can edit the price, description, and more. 

Don’t want to offer an item in the store anymore? Here’s how you can remove it from the store. 

In WordPress, go to the Products page. Hover over the item and choose Trash. Super simple!

WooCommerce Products

What takes a product from good to great? 

Listing a product for sale in your swag store isn’t just about adding it in. You’ll want to pay attention to how it’s listed!

A good product title will describe what the item is, but also what makes someone want it. For example, in my example, the shirt was called “Short Sleeve Unisex T-shirt.” While this is an accurate description, it doesn’t describe the shirt in its entirety. A much more engaging title might be “Rainforest Flower Painted T-Shirt”

If you’re struggling with product names, go to an online store you shop from and look at how they name their products! 

The same can be said for the product description. A good product description gives the buyer all the information they would want about that item. Things like size and weight are good to include here. But also try to describe the feel of the product and maybe what inspired the design. If someone is on the fence about buying this item, the description is your chance to convince them!

You can also check out helpful posts like this one on how to write product descriptions that convert!

Make sure to utilize tagging and categorization to make your products easier to find in the store. Think about how you shop online. What kinds of keywords can you use to sort your items? If you’re unsure, visit an online store that sells similar items and use that as inspiration.

Use engaging photography. Printful will give you helpful mockups. But if you have any images of people wearing or using the items in real life, include those! 

How to pull sales reports from WordPress 

At certain intervals, you need to pull reports to see how much you’ve sold and how much you’ve made. With WordPress, this is very easy to accomplish.

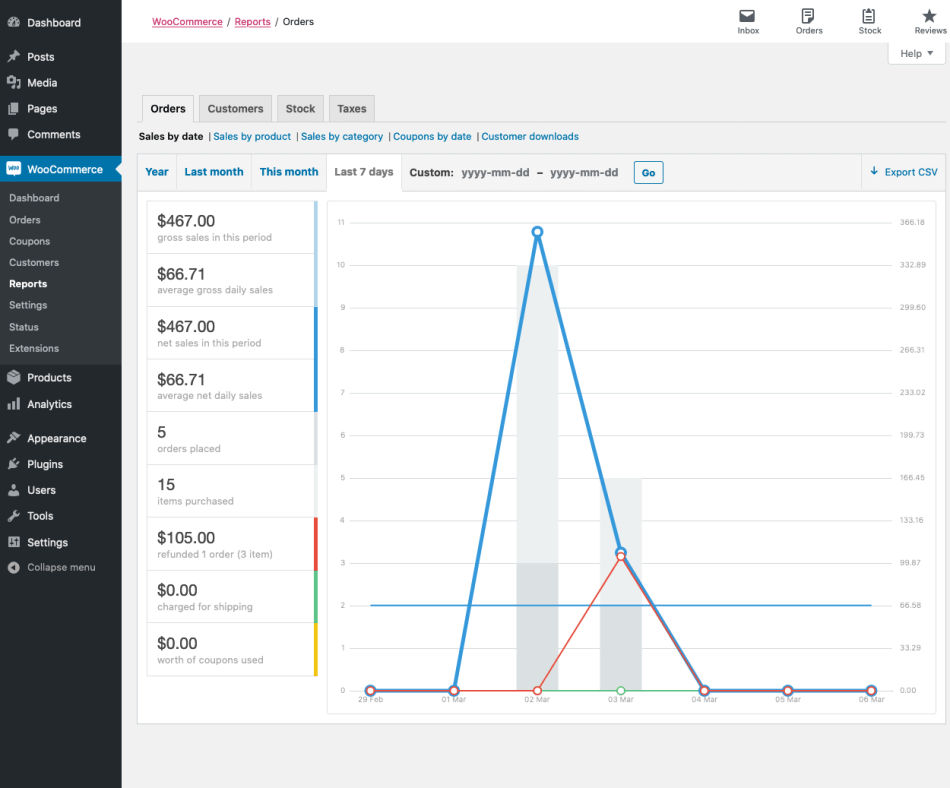
To grab sales reports, go to WordPress > WooCommerce > Reports. 

WooCommerce sales reporting.

Parse the information however you need to use the options along the left and top. When you have what you need, click “Export CSV” in the top right.

And there you have it! You are ready to start selling amazing merch through your WordPress website. If you run into a problem, don’t forget that WooCommerce and Printful both have excellent customer service teams!

Do you already have a swag store? Link it in the comments below or tweet it at us: @cloud22com

Remember that your store needs to always be active, fast, and secure. A slow or sketchy store will turn off buyers pretty quickly. If using WordPress, the hosting you choose can ensure that your store is always up, looks great, and performs fast. We definitely count good hosting as a top priority within your software stack.

Cloud22 Managed Hosting checks every box. We manage your updates – making sure that when your theme developer releases an update or patch, you get it right away. We back up your site, just in case you make a wrong move in your theme settings.  Our servers are integrated with LiteSpeed cache and Cloudflare CDN, so the beautiful design you used your theme to build is served to visitors quickly.

Should You Set up a Swag Store for Your NonProfit?

store shelves with t shirts
Photo by Aden Ardenrich from Pexels

The purpose of a nonprofit organization is to raise money to further a mission. That mission might be feeding the homeless or spreading awareness about an issue. Nonprofits are not businesses in the traditional sense, in that they don’t provide a good or service for a profit.

However, think of the last time you went to a museum or animal sanctuary. Many places like these have gift shops where swag is sold. Setting up a swag store for your nonprofit means you can provide fun merchandise that patrons and donors can take home. 

So if you are asking yourself… “would my nonprofit benefit form having a swag store?” you have come to the right place! In this post we are going to review how a swag store can help your nonprofit.

Wait… can a nonprofit sell goods?

Good question – the answer to which is yes! A nonprofit can definitely sell goods. It might seem somewhat counter intuitive to sell goods and make a profit through a nonprofit. However, as long as those funds are properly taxed, it is perfectly okay for nonprofits to sell goods.

“To clarify, a nonprofit may raise money from typical fundraising and associated events. However, if financial gain occurs from unrelated activities than that profit must be taxed as business income. (1)”

upcounsel.com

Basically can sell goods to raise funds toward a goal, or tax the sales from goods as business income. So long as you can differentiate clearly come tax time, you should be all set to raise money from your store!

Why should you set up a swag store for your nonprofit? 

There are many benefits to setting up a swag store online for your nonprofit organization. There are financial as well as marketing benefits. It’s a good idea to review the reasons for setting up a store prior to doing so. That way you can up realistic goals, plan out how to market the store, and choose the right swag to complement the reasons you chose. 

More revenue

Selling cool stuff means more money at the end of the day. 

Donor fatigue is real! It happens when people stop donating to a charity, even if they have done so repeatedly before. To make donating more exciting, asking for donations in exchange for a cool mug or t-shirt can reinvigorate a donor’s interests. 

If you sell your merchandise outside of a specific fundraiser, it’s simply another way to bring funds into the organization.  People typically give out of emotional obligation or connection to a cause. It’s why you can’t help but grab that cute turtle plushie in the gift store of the zoo! If you offer a swag store that caters to those same feelings, people will be more tempted to open their wallets. 

At the end of the day, setting up a swag store is just another way to fund your amazing cause.

More brand awareness for your nonprofit

Selling swag to people who love your nonprofit means they are essentially paying to promote your organization! 

Think about it: if you sell t-shirts, hats, or stickers with your company’s logo on them, people will now be walking around displaying that logo. It’s another way to get your brand out into the world and in front of new eyes. If a donor buys a shirt and their friend asks, “where’d you get that awesome t-shirt?” the donor can then strike up a conversation that leads their friend to your website.

Honoring donors and volunteers

Swag is a fantastic way to just say thank you. After all, everyone likes swag!

Consider offering discounts to your swag store to people who have helped your nonprofit in its mission. For example, after a donation, send a donor an email with a 25% off coupon to your swag store. Or give volunteers a 50% off code to pick out something fun from the store after they help out at an event. 

People contribute to nonprofits out of the kindness of their hearts, usually without expecting anything in return. But that doesn’t mean that a thank you gift won’t go a long way!

List building 

When you sell items through a store, there is important information you must collect at the same time. That includes the buyers name and email address. With their permission, of course, you can add buyers to an email list. 

Email lists are great for continuing to keep in touch with people who have supported your organization. Consider emailing them with updates on your nonprofit, dates of events, new fundraisers, and alerts when new swag is added to the store.

Now that we know why we want to do it, let’s review how you can set up an online swag store for your nonprofit. 

What do you want to sell?

When thinking about whether or not you want to build a swag store, the swag itself is key! It’s not enough to throw your logo on some stuff and sell it. You have to figure out what items your buyers would want and what would complement your mission. The possibilities are pretty much endless. 

Some classic ideas include:

  • T-shirts
  • Mugs
  • Hats
  • Stickers
  • Keychains 
  • Tote bags

Some quirkier ideas include:

  • Phone cases
  • Framed art
  • Jewelry
  • Towels
  • Stationary 

The items you pick should be things that your community actually wants. If your audience is primarily men, you may want to focus on items that are more popular with guys. If your organization is focused on environmental conservation, reusable things like straws and tote bags are a smart choice. Everyone loves a classic t-shirt, but make sure what you choose meets the tone and branding of your organization!

Not sure what to pick? Poll your existing donors and volunteers to see what kind of merch they would be most excited about. Ask your social media followers which items they would want most. Or look at swag stores of nonprofits that do similar work to you!

Where does the money go?

When you get to work setting up a swag store for your nonprofit, you need to be 100% certain about where that money will go. Starting with this goal will tell you how a swag store can help your nonprofit in the long run.

A good chunk of it needs to go into running the store itself. You’ll need to be able to cover the costs of selling the items. That means the cost of the website and hosting, as well as creating and shipping the swag. 

Whatever is leftover is your profit. That can go toward your nonprofits’ expenses or toward a specific fundraising goal. Just make sure that you are charging enough to turn a profit. Many sites like Printful will help you calculate how much of a profit you can make on a single item.

What to do after setting up a swag store for your nonprofit

Simply setting up your swag store isn’t enough! You need to make sure that the store does more for your nonprofit than just selling merch. Here are a few ways you can benefit even further from your swag store sales.

Make sure you thank buyers after they buy! Customize your receipt email to include a heartfelt thank you. Include a photo or video that makes an emotional connection. Explain again what kind of a difference their purchase made. 

And remember to be specific! Maybe for every dollar they spent, one turtle is fed for one day. Saying thank you and reaffirming that their purchase made a difference is very important.

Ask them to share a photo or send a review. Social proof is a huge driving power in e-commerce. If your buyer shares a photo of them wearing or using their merch on social media, their friends and followers are more likely to buy as well. Not only that, they are advising your cause for you. 

A review or testimonial of the item or buying process is something you can use on your website to encourage more sales. This shows future buyers that people are already buying. Shoppers love to see your statements about quality backed up by people who have the product in their own hands.

Email them when you have new products. It’s important to collect email addresses of buyers for this reason. Say you sell mugs, hats, and t-shirts. Use your email marketing tools to segment or tag emails based on what products are purchased. That way, when you have a new t-shirt design in your store, you can email all the people who previously bought t-shirts and invite them to get a new one!

Look at your sales quarterly to evaluate what is selling and what isn’t. Making it a habit to review sales every three months or so can help out a lot. If you notice one item is really popular, investigate ways to leverage that. Maybe you should offer that item in more colors or sizes. Maybe you should put that item on the homepage of your website.

Likewise, make note of any items that are not selling much at all. It might be worthwhile to experiment with varieties of the product, add it to a sale section, or pull it from the store altogether. 

Update any totals to reflect your fundraising goals. If you are selling merchandise for fundraising, you may have to manually update any public displays. If you have a goal thermometer or meter on your website, make sure you are consistently updating it to reflect your total. 

How to set up your swag store using WordPress

In our next post, we will walk through all the steps of launching your own swag store using WordPress. You don’t need to be a professional designer or developer to create a beautiful store. We will talk about: 

  • The programs and software you should use to launch your swag store.
  • How to price items fairly while still keeping your goal profits in mind.
  • Where to go to find awesome designs.
  • How to add, edit, and remove items from your store.
  • How to write a great product description.
  • How to pull sales reports and totals.
  • The steps for building an email list through your store.

Look out for the walk through on our blog next week!

Do you already have a swag store? Link it in the comments below or tweet it at us: @cloud22com

Remember that your store needs to always be active, fast, and secure. A slow or sketchy store will turn off buyers pretty quickly. If using WordPress, the hosting you choose can ensure that your store is always up, looks great, and performs fast. We definitely count good hosting as a top priority within your software stack.

Cloud22 Managed Hosting checks every box. We manage your updates – making sure that when your theme developer releases an update or patch, you get it right away. We back up your site, just in case you make a wrong move in your theme settings.  Our servers are integrated with LiteSpeed cache and Cloudflare CDN, so the beautiful design you used your theme to build is served to visitors quickly.
Must-Have Website Tools for NonProfits

If you’re about to start fundraising online – or if you’ve been looking for ways to up your fundraising game – building a great stack of online tools is essential. 

Big or small, every nonprofit needs to consider certain aspects of the online experience when starting or improving online fundraising. This can go from the obvious – like your website – to things like accounting software and password managers. 

It’s important to consider not only how donors interact with you online, but how your staff and volunteers interact with each other. Maybe you’ve moved to a more virtual set up in the last year, or maybe you just want to streamline your processes. Either way, there are hundreds of software options out there that are perfect for nonprofits. 

We asked Taylor Waldon, Content Strategist at GiveWP, what software she thinks is essential for nonprofits.

“Asana is great for project and task management. Mailchimp is a strong email marketing tool with great pricing for nonprofits, and I love Salesforce! While social media isn’t really software, I would argue it’s essential in the nonprofit tech stack.”

We must say, we agree!

Let’s take an individual look at some of the most essential kinds of online tools your nonprofit needs. Cost is always a factor for nonprofits – so most of these tools are free or have special pricing options for nonprofits. In choosing these tools to recommend, we also kept in mind feature choice and ease of use.

Remember – no software is one-size-fits-all. Use this information as a jumping off point to begin building your custom nonprofit software stack! 

Content Management System 

A content management system, or CMS, is what you use to build and edit your website. While it’s possible to hire a developer to build a custom website for you, it can be faster and more cost effective to use a CMS to build your own website! 

At Cloud22, we obviously recommend WordPress as the top CMS choice for nonprofits. The WordPress.org open source software is a fantastic option if you’re prepared to DIY the majority of your website experience. 

There are numerous reasons WordPress is perfect for nonprofits:

  • Customization. Your site needs to be unique to your organization and mission. The design needs to complement the emotional tone that you want to convey when fundraising online. You don’t have to be a professional designer or developer to launch a website that works well and looks great. The plugins and themes available through WordPress allow you to build the site that suits all of your needs.
  • Educational resources. While you can (and should) hire someone to help you with your website (especially when it comes to security!) you can do a lot of the work yourself. The WordPress community is overflowing with educational resources in virtually every format you can think of. From YouTube videos to live meetups and events to active support channels… there is a way for you to get your questions answered.
  • Cost: Believe it or not – WordPress is free! The main costs associated with a WordPress website are the hosting and domain name. Great hosting plans start at about $100 per month and a domain name will typically run you less than $20 per year. There are thousands of free themes and plugins. You can always spend more on premium themes and plugins, but the up front cost to get started is very low! 
  • Ownership: These days data ownership is essential when operating online. Consumers of all kinds – including donors – are more educated than ever before and they want to know that their payment information is always safe. With other CMSs and fundraising software, you don’t always own the data 100%. With WordPress, all data either lives on your hosting server or off-site within a payment processing system like PayPal or Stripe. When you own that data, you can ensure that it’s safe and always know what is being done with it. 
  • Integrations: A website needs to serve as the central hub for all the activities you do online. WordPress is the ideal solution when looking to accomplish this. Whether you want to automate how your social media, your accounting, or your marketing connects to your website, there is almost always a way to do it! WordPress is the single most popular CMS in the world. As a result, most other tools and software will have a way to connect to it.

Donation Software

When accepting donations online, there are many options out there. We recommend two, depending on your needs. 

If you’ve decided to use WordPress, we recommend GiveWP. It is the leading donation plugin for WordPress, with over 100,000+ installs and a 4.5 star rating. It’s free to begin using and allows you to take donations directly on your website using Stripe or PayPal. 

It has a nonprofit friendly pricing system for addons; if you need additional services like Recurring Donations or Fee Recovery, the cost to add those to your site is doable for most organizations. One of our favorite things about GiveWP is the fact that you can take donations for multiple causes directly on your site without redirecting your visitors.

DonorBox is a good option if you don’t want to take donations on site, but prefer to use a 3rd party. (There is also a WordPress plugin available!) The pricing is a little steeper, but it pays for itself with a suite of options and features. With Donorbox you can accept monthly recurring donations and put the management of those plans in the hands of your donors. 


Security Software

All of the information associated with your nonprofit needs to be kept under lock and key. You may be dealing with highly sensitive or private information taken from donors, staff, volunteers, or the people that your nonprofit serves. 

When launching your website, take a look at the security options available to you. Your host should offer a suite of security services that are focused on preventing hacks and breaches. If you’re using WordPress, look into security plugins like  Succuri. Any person that is responsible for updating or managing the website should be highly versed in how to find and report security issues. A good security tool should not only prevent hacks and breaches, but be readily available to provide emergency support if needed.

The more accounts that you have online for managing your nonprofit, the more passwords you will have! Make sure that you have a way to keep those passwords saved. We like 1Password,  a password manager that stores and helps you share credentials with your team. The cherry on top – 1Password offers 50% off of team plans for nonprofits! 

Learn about 1Password for NonProfits.

Marketing Software

Remember – while nonprofits and for-profit businesses have many differences, they both need marketing! Marketing allows you to get the word out about all the amazing things your nonprofit does. This keeps volunteers and donors coming to you on a regular basis. 

If you collect email addresses from anyone – like at events or through fundraising – you should be using those emails in your marketing! This doesn’t mean you need to spam people’s inboxes constantly. But use a tool like MailChimp to collect, store, and organize email addresses, as well as to email your audience on a regular basis with important updates.


The pricing structure at MailChimp does vary, starting with a free plan. But if you need paid features, MailChimp offers a 15% discount to verified nonprofits! 

Learn about MailChimp for NonProfits.

You may also be marketing on social media. If you don’t have a professional graphic designer on call, you can develop and send out your own posts pretty easily using online tools! Unsplash and Pexels are two excellent resources for finding stock imagery for free. Pexels even has a library of stock videos!

Put it all together with Canva. Canva is a free tool that provides you with the ability to quickly make eye-grabbing social media posts. The UI is incredibly simple and comes with hundreds of templates for posts. It even provides ideal image sizes for different social media platforms so you never have to worry about optimization.

Accounting Software 

While no accounting software can fully replace a professional accountant, it’s a good idea to have software on hand to help you organize what’s coming in and out of your organization. A good accounting software will allow you to develop systems and produce reports that you can then give to your accountant. 

The right accounting software should be affordable, easy to learn and use, and suited for the unique needs of nonprofits. 

We give a ton of credit to Investopedia for coming up with this top list of accounting software for different kinds of nonprofits:

Internal Documentation and Communication Software 

As the world shifts to being more and more online, your team should, too. While face to face is always great, there are some great options for conducting internal tasks online. 

G Suite for Nonprofits is a fantastic way to combine a ton of services in one. It’s free for nonprofits and comes with professional email addresses at your website’s domain, video meetings, 30 GB of cloud storage, security controls, and standard support. You get email, Google Drive, Google Calendar and a whole lot more.

Learn more about G Suite for NonProfits.

In addition, if you’re looking for a software that will help you track tasks or the progress of projects, check out Asana. Verified nonprofits save 50% with Asana, so you can get the same features while saving more. Companies like The Y and United Way use Asana for their internal task tracking. 


The software allows you to collaborate on plans, conversations and files across your entire team. It’s beautiful UI is easy to learn and use so you can build workflows, automate processes, and achieve your goals. 

Learn about Asana for NonProfits. 

Have you tried any of these tools? Which ones are your favorite? How have they worked for you? Let us know in the comments or tweet at us: @cloud22com

Remember that your website is the main hub of all your online work. If using WordPress, the hosting you choose can ensure that your site is always up, looks great, and performs fast. We definitely count good hosting as a top priority within your software stack.

Cloud22 Managed Hosting checks every box. We manage your updates – making sure that when your theme developer releases an update or patch, you get it right away. We back up your site, just in case you make a wrong move in your theme settings.  Our servers are integrated with LiteSpeed cache and Cloudflare CDN, so the beautiful design you used your theme to build is served to visitors quickly.